
Blog
Wood Pool Deck Refinishing for Homeowners: Protect the Splash Zone
Refinish it yourself this weekend if the structure is sound. Hire a pro if you find rot, soft joists, or you want a polyurea resurfacing job. Either way, keep the splash zone textured and low-sheen for safety. Your first move: inspect the deck by pressing on boards near the water and testing whether the old finish repels moisture by observing how water behaves on the surface.
Get a Free Estimate or call 407-250-1838
TL;DR:
Mr. Pool Screen
Restore More Than Your Pool Deck
If your aging pool enclosure also shows weathering, rust, or aesthetic deterioration, Mr. Pool Screen provides restoration in Central Florida.
Explore pool enclosure restoration
Table of Contents
- How to Inspect Your Wood Pool Deck Before Refinishing
- Cleaning and Brightening: The Prep Work That Actually Matters
- Fixing Boards and Fasteners Before You Stain
- Which Stain or Coating Actually Holds Up Near a Pool?
- Applying the Finish Without Ruining It
- Why Some Pool Decks Belong to a Professional, Not a Weekend
- Getting Pool-Area Wood and Enclosures Back to New
- Sources
- FAQ
How to Inspect Your Wood Pool Deck Before Refinishing
Start at the corners and work toward the pool edge, since that’s where moisture damage concentrates first. Press down on every board with your full weight, especially near fastener lines and butt joints.
- Bounce test: any spring or give underfoot signals a joist problem, not a surface one.
- Probe with a screwdriver: soft spots that sink in mean rot, and that board (or joist) needs replacing, not refinishing.
- Check every fastener head for rust bleed, backing out, or missing screws.
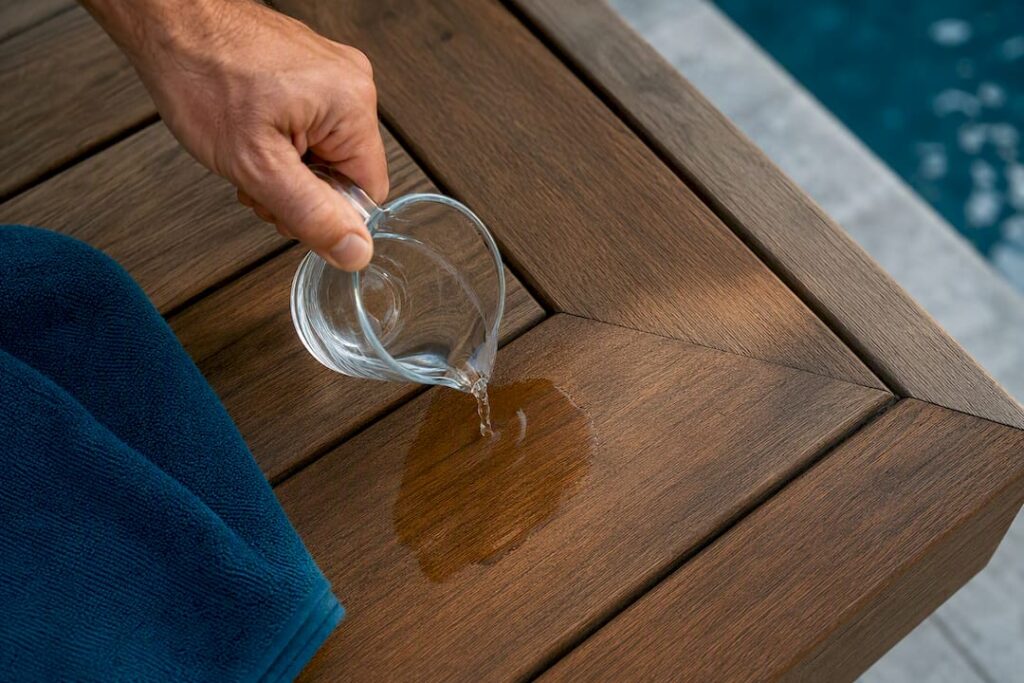
- Water-bead test: splash a cup of water on the boards. If it beads up, the old finish still works and you just need a light refresh. If it soaks in within a minute, the wood is bare and ready for a full strip and restain.
Run the numbers before you commit a weekend. DIY refinishing on a sound deck typically runs $3 to $7 per square foot in materials, while professional repair work climbs to $10 to $40 per square foot once structural fixes enter the picture. If your inspection turns up rot at more than a couple of boards or any joist softness, you’re looking at a repair job first, refinishing second.
Cleaning and Brightening: The Prep Work That Actually Matters
Skipping prep is the single biggest reason a new stain job fails within a year. Dirt, mildew, and old finish residue block penetration, so the stain sits on top instead of soaking in, then peels.
Pick your cleaner based on what you’re dealing with. Sodium percarbonate cleaners handle routine dirt and mildew without harming wood fibers. If the deck has an old, failing solid stain, a hydroxide-based stripper breaks that film down so it rinses off. For tannin bleed or the black streaking that rust fasteners leave behind, an oxalic acid brightener is what actually pulls the discoloration out.
- Clear the deck completely, including furniture, planters, and rugs.
- Apply the cleaner and scrub along the grain, never against it, to avoid raising fibers unevenly.
- Rinse with a pressure washer set to a 40 degree wide-angle nozzle, keeping the tip moving and roughly 12 inches off the wood.
- Apply brightener if staining is present, then rinse again.
- Let the deck dry fully, 24 to 48 hours depending on humidity, before any sanding or staining begins.
Pressure washers cause more damage than they fix when used wrong. A tight fan-tip nozzle held too close will gouge softwood grain in seconds, and that gouge shows through every coat of stain you put on afterward.
Pro Tip: Feather the pressure washer in with a sweeping motion instead of blasting straight down. Professional crews start the trigger while the nozzle is already moving, which prevents the stop-and-go marks that ruin an otherwise good deck restoration.
Fixing Boards and Fasteners Before You Stain
Not every damaged board needs replacing. A board with light surface cupping or a shallow split can usually be sanded and saved. Rot, deep splits that run with the grain, or boards that stay damp days after a rain need to come out.
- Replace fasteners at the splash zone with stainless steel or coated composite screws. Standard galvanized screws corrode fast in chlorinated splash and leave the black streaks you’re trying to clean off in the first place.
- Countersink every screw slightly below the surface so water doesn’t pool on the head and accelerate rust.
- For existing rust streaks, run the cleaner and brightener pass first. If staining remains, localized sanding followed by a color-matched wax filler for the old holes handles it without pulling the board.
- Sand in stages: 60 to 80 grit for heavy weathering, finishing at 100 to 120 grit. Stop there. Sanding past 120 grit closes the wood’s pores and the new stain won’t absorb properly.
Rusted screws are rarely a one-time cosmetic problem. If a fastener bled once, it’ll bleed again unless you swap it, and a full guide to pool deck coating peeling walks through why that recurring failure pattern shows up so often near pools.
Which Stain or Coating Actually Holds Up Near a Pool?
Penetrating semi-transparent stains are the right call for most wood pool decks. They soak into the wood fibers rather than sitting on the surface, which means constant splash, chlorine exposure, and UV don’t cause the peeling and flaking you get with film-forming products.
- Penetrating semi-transparent stain: locks out moisture and UV while staying flexible enough to avoid the peeling that plagues solid, film-forming coatings on pool decks.
- Solid or film-forming stains: hide wood grain and cover flaws, but they trap moisture underneath and blister faster in a splash zone.
- Polyurea resurfacing systems: a different category entirely, used to resurface rather than refinish. These are professional-grade, cure in under 60 seconds, and are walk-on ready in about an hour.
Polyurea isn’t cheap, running roughly $6 to $12 per square foot installed, but it’s built for the long haul, with lifespans reported at 20 to 25 years or more. That’s the trade-off: penetrating stain costs less and you do it yourself every few years, or you pay more once and largely forget about it for two decades.
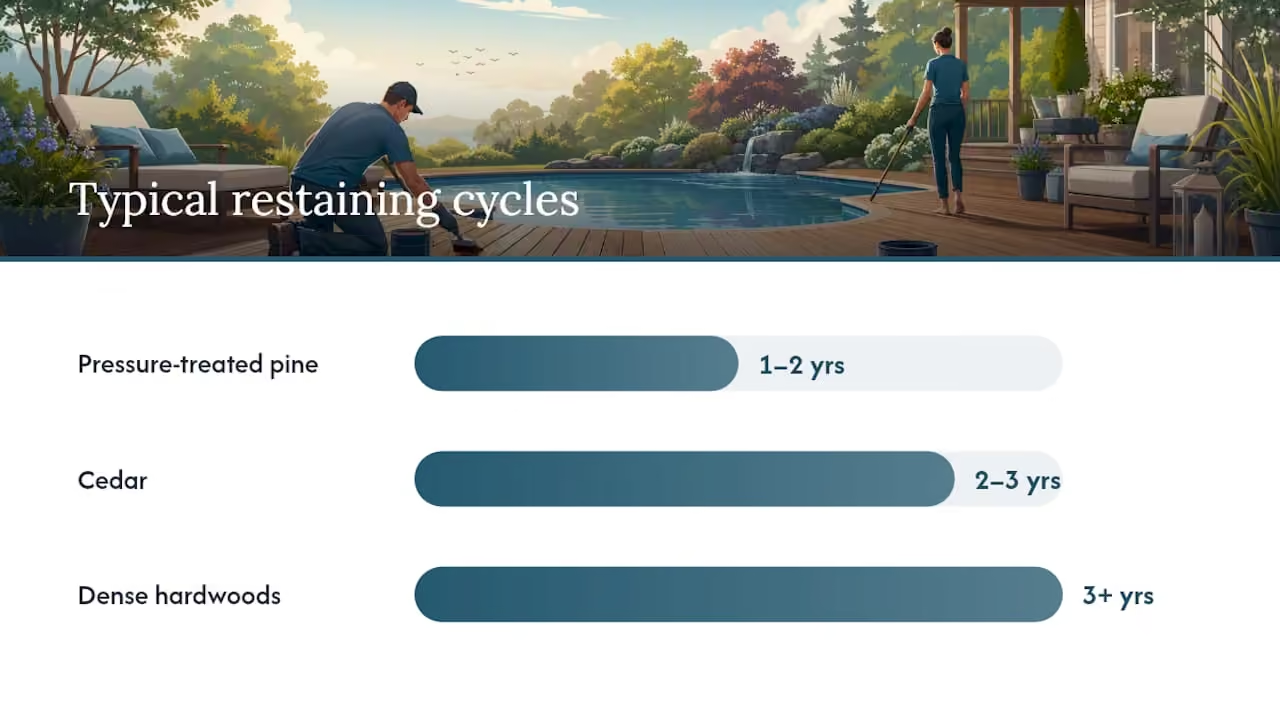
Maintenance cycles vary by wood. Pressure-treated pine typically needs restaining every 1 to 2 years right at the pool edge, cedar stretches closer to 2 to 3 years, and dense hardwoods can go 3 or more between coats. If you’re unsure whether your existing finish is oil or water based, that distinction changes what you can recoat it with without stripping first.
To avoid lap marks, work board by board rather than coating in wide horizontal passes. Let the stain soak for the manufacturer’s stated window, usually 5 to 15 minutes, then wipe off anything that hasn’t absorbed. Excess stain left sitting on the surface is what creates the blotchy, uneven sheen homeowners complain about most.
Wood near a pool in Orlando or Winter Garden faces sun, daily humidity and frequent rain, so choose a finish rated for heavy moisture and UV exposure.
Applying the Finish Without Ruining It
Your applicator choice matters less than your technique. A pump sprayer covers ground fast but needs a back-brush pass to work the stain into the grain evenly. A pad applicator or natural-bristle brush gives you more control on a smaller deck and is often the better pick for a first-time DIY job.
- Work in the shade or during overcast hours. Direct sun flash-dries stain before it can penetrate, leaving lap marks that never blend out.
- Apply along the length of each board, then immediately wipe excess with a clean rag or applicator pad.
- Keep a wet edge as you move across the deck so you’re never overlapping onto stain that’s already started to set.
- In the 3 to 4 feet nearest the pool, choose a textured or lightly broadcast-aggregate finish instead of a smooth, glossy one.
That last point isn’t a style preference. Pool deck surfaces should meet the ICC/ANSI wet DCOF minimum of 0.42 under ANSI A326.3, and a smooth, glossy sealer near water routinely fails that standard even when it looks great dry. If your deck already has a slip problem, there are targeted fixes for slippery zones that don’t require a full refinish.
Pro Tip: Test the water-bead reaction on a scrap board or hidden corner 24 hours after your final coat. If water still beads instead of soaking in, you’re cured and safe to walk. Give it a full 48 to 72 hours before refilling the pool or letting kids run laps around the edge.
Why Some Pool Decks Belong to a Professional, Not a Weekend
A sound deck under about 400 square feet, with no rot and a cooperative weekend forecast, is a reasonable DIY project. Most homeowners in that range finish staining in a single weekend if the old finish isn’t badly peeled.
Once you’re dealing with structural rot, widespread fastener corrosion, or you want a polyurea resurfacing system, hand it to a professional. That equipment and material aren’t sold for casual weekend use, and the margin for error on adhesion and cure timing is thin. Professionals also carry stainless fastener stock and industrial-grade coatings on hand, which shortens the job and avoids the callback problems that come from mismatched hardware or rushed dry times.
— Michel
Getting Pool-Area Wood and Enclosures Back to New
If your deck problems come bundled with a rusted, sagging pool cage or a screen enclosure that’s seen better days, professional services are available to handle both without the price tag of a full rebuild.
That same approach applies to deck surfaces too. Mr. Pool Screen’s pool deck staining service covers wood, concrete, masonry, and stone, so you’re not juggling separate contractors for the cage and the deck beneath it. If your inspection turned up more than a weekend’s worth of repairs, or you’re staring down a rusted enclosure alongside a tired deck, request a pool screen restoration estimate and get a straight read on what’s cosmetic versus what actually needs replacing.
Get a Free Estimate or call 407-250-1838
Sources
- Fine Homebuilding — Deck refinishing guide
- ArmorThane — Pool deck resurfacing guide
- Home Depot — How to refinish a deck
FAQ
How Long Does Wood Pool Deck Refinishing Take?
A sound deck of 200 to 400 square feet usually takes a single weekend, including cleaning, drying time, and staining, provided the weather cooperates and there’s no structural repair involved.
What’s the Best Stain for a Wood Deck Near a Pool?
Penetrating semi-transparent stain is generally the top choice because it soaks into the wood instead of forming a surface film, which resists the peeling that chlorine splash and constant moisture cause in film-forming products.
How Do I Get Rid of Rust Stains on My Pool Deck?
Run a cleaner and oxalic acid brightener first, since that removes most rust streaking; if staining persists, light localized sanding followed by a color-matched wax filler handles the rest.
Is a Glossy Finish Safe Near a Pool?
No. Glossy, smooth finishes in the splash zone routinely fail the ICC/ANSI wet DCOF minimum of 0.42, so a textured or matte finish within 3 to 4 feet of the water is the safer standard.
When Should I Hire a Professional Instead of DIY?
Call a professional if your inspection finds joist rot, widespread fastener corrosion, or if you’re considering a polyurea resurfacing system, since those jobs require equipment and materials beyond typical weekend DIY scope. Professionals can handle both deck refinishing and the enclosure restoration that often needs attention at the same time.