
Blog
Protecting a Freshly Coated Pool Enclosure During the 24–72 Hour Cure
Give the coating 24 to 72 hours of true cure time before any water touches it, skip bleach, ammonia, abrasive pads, and pressure washers for good, and write down the coating brand, batch, and application date before you forget. Do those three things and a professional recoat job on your pool enclosure should hold its color and adhesion for years instead of months.
Get a Free Estimate or call 407-250-1838
TL;DR:
Mr. Pool Screen
Restore Your Pool Enclosure With Care
Mr. Pool Screen restores aging enclosures with durable coatings and fasteners, helping protect safety, appearance, and your investment.
Explore pool enclosure restoration
Table of Contents
- Pool Enclosure Maintenance After Coating: The First 14 Days
- Safe Cleaning Methods and Products for a Coated Enclosure
- How Do You Inspect a Coated Pool Enclosure for Damage?
- Touch-Up Technique and Sealant Guidance for Chips
- What’s the Right Maintenance Schedule After Coating a Pool Enclosure?
- When Does DIY Maintenance Stop Being Enough?
- How Do You Protect a Coated Pool Enclosure in Bad Weather?
- What Homeowners Get Wrong About Post-coating Care
- Get Professional Help From Mr. Pool Screen
- Sources
- FAQ
Pool Enclosure Maintenance After Coating: The First 14 Days
The two weeks right after coating matter more than any other stretch of ownership. Coating chemistry is still setting up, and water, dew, or a stray sprinkler cycle during that window can cause peeling at the joints before the coating ever gets a fair shot at protecting your screens and frame.
Here’s the order of operations that keeps a fresh finish intact:
- Hold off on water. Keep sprinklers, hoses, and rain exposure away from freshly coated rails for at least the first 24 to 72 hours, longer in humid weather, since that’s when the coating is most vulnerable to lifting.
- Pull tape and masking carefully. Remove masking tape and plastic sheeting at a low angle, slowly, so you don’t tear off soft coating edges that haven’t fully hardened.
- Walk the perimeter. Look for drips, runs, overspray on screens, any exposed bare metal the crew missed, and rust bleeding through around fastener heads.
- Start a maintenance log. Note the coating brand, batch number, application date, and any contractor notes. This single habit makes every future touch-up, warranty claim, or professional visit faster.
Safe Cleaning Methods and Products for a Coated Enclosure
Routine cleaning is where most homeowners accidentally undo a good coating job. The right tools are simple: a garden hose with an adjustable spray nozzle, a soft-bristle brush, microfiber cloths, a bucket, and a mild dish detergent diluted in water.
What to avoid is just as important:
- Bleach and ammonia, which break down protective coatings and cause premature fading over repeated use.
- Abrasive scrub pads or steel wool, which scratch the topcoat and create entry points for moisture.
- Routine pressure washing, since excessive PSI can rip screens and strip coating adhesion even when it looks like it’s just rinsing dirt.
For mildew spots or mineral staining on the lower rails, a diluted white vinegar solution applied with a soft cloth usually lifts the stain without touching the coating. Rinse thoroughly with the hose afterward so no residue sits on the metal.
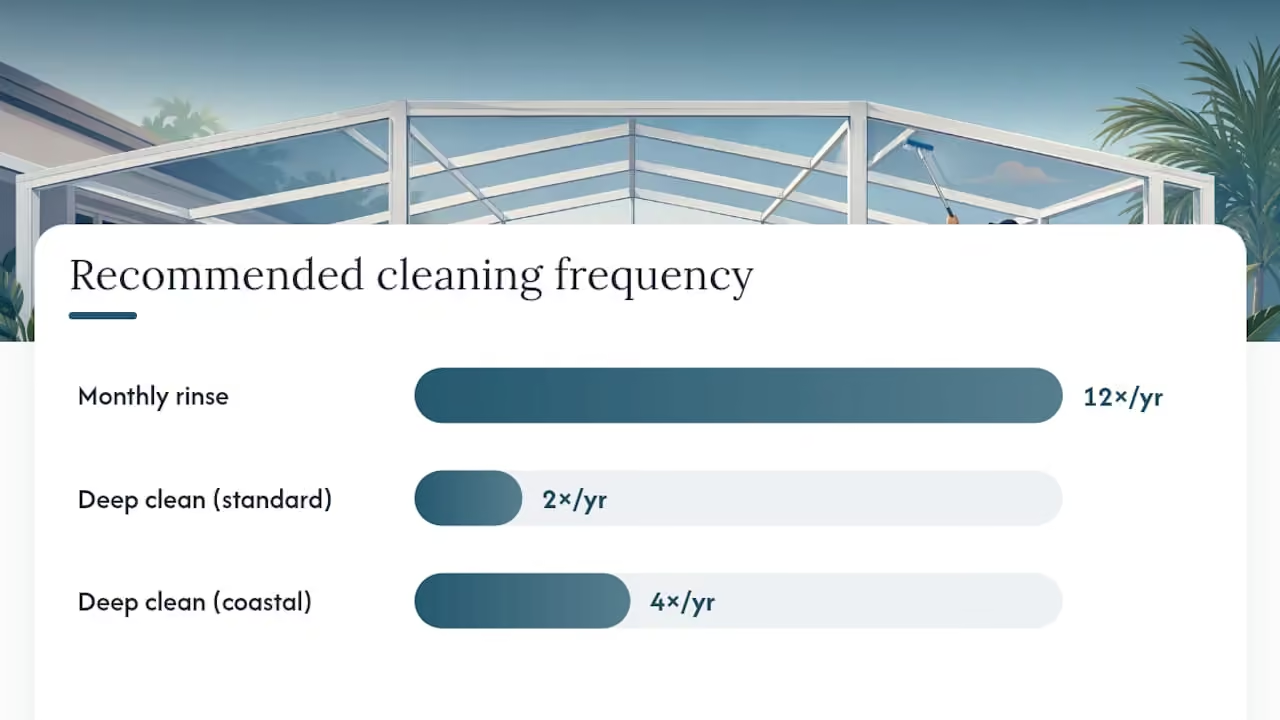
Pro Tip: Rinse monthly with plain water and a soft brush, then plan a real deep clean each spring and fall. Coastal or high-pollen properties often need that deep clean quarterly instead.
How Do You Inspect a Coated Pool Enclosure for Damage?
Deterioration on a coated enclosure almost always starts in the same spots: lower rails, gutters, door sills, fastener heads, and seams where two panels meet. These are the places moisture collects and lingers longest, so a quarterly walk-through focused there catches problems while they’re still cosmetic.
Run through this list every three months:
- Check lower rails and gutters for standing water, debris buildup, or dark staining that signals trapped moisture.
- Press on fastener heads. Surface discoloration is usually just rust bleed and wipes away; pitting or a fastener that crumbles under light pressure means it needs replacing, not touching up.
- Test door sills and hinges for smooth operation. Grinding or resistance often means corrosion is building where you can’t see it yet.
- Tighten loose screws with hand tools only. Over-torquing strips the threads in aluminum framing and creates a bigger repair than the one you started with.
- Flag any bowed panels, separated seams, or rails that feel spongy. That’s a structural issue, not a coating issue, and it calls for a professional.
Your maintenance log earns its keep here. If the same corner keeps showing rust every quarter, that’s not bad luck. That’s a drainage or ventilation problem worth solving once instead of patching four times a year.
Touch-Up Technique and Sealant Guidance for Chips
Small chips are normal and easy to fix if you handle the prep correctly. Clean the chipped area with mild detergent and water, let it dry fully, then lightly sand the edges so the new coating has something to grip.
Follow this sequence for a repair that actually lasts:
- Sand only the chipped area, feathering the edges rather than digging into surrounding good coating.
- Prime any exposed bare metal before recoating. Thorough surface prep and an aluminum-specific primer are what separate a touch-up that lasts years from one that peels again in months.
- Apply a matching exterior-grade coating in thin coats rather than one thick pass.
- Once the touch-up cures, a clear exterior sealer adds meaningful UV and moisture resistance and can stretch the gap before your next full recoat.
Reseal every one to two years depending on sun and salt exposure, and watch for chalky residue on your hand after wiping the rail. That’s the clearest sign the current sealer has worn through.
Pro Tip: Never mix sealer chemistries. A water-based topcoat over an oil-based sealer (or the reverse) can cause bubbling or peeling within weeks. Match the sealer to whatever system the coating job used.
What’s the Right Maintenance Schedule After Coating a Pool Enclosure?
A coated enclosure doesn’t need constant attention, but it does need a predictable rhythm. Skip a season and small issues compound into expensive ones.
- Monthly: Light rinse with the hose, plus a quick visual walk for new stains, chips, or debris caught in gutters.
- Quarterly: Full inspection of fasteners, rails, and gutters; handle small chips before they spread.
- Annually: A deeper clean, a resealing decision, and an honest look at your maintenance log for repeat trouble spots.
Homes near the coast or under heavy pollen and UV exposure should tighten that timeline. Salt air and intense sun both accelerate wear on coated surfaces, so monthly can become biweekly and annual resealing can become an 18 month cycle instead of a full two years. Many well-maintained enclosures still need a full recoat every three to five years depending on exposure, no matter how good the routine cleaning is.
When Does DIY Maintenance Stop Being Enough?
Regular upkeep handles the small stuff. It doesn’t fix an enclosure where corrosion keeps reappearing in the same three spots every quarter, or where the coating is failing across large sections instead of a chip here and there. That’s the point where a restoration crew, not another can of touch-up coating, is the right call.
Some professional restoration processes emphasize two details often overlooked by DIY jobs: water-based acrylic coatings applied over properly prepped surfaces, and durable fasteners that resist rust bleed common around cheaper screws. The company’s own guidance on humidity and curing recommends coating only when relative humidity sits below 65%, which is exactly the kind of detail that determines whether a recoat lasts five years or fails in one. A restoration job backed by a multi-year warranty is worth considering once you’re patching the same corner more than once a year.
How Do You Protect a Coated Pool Enclosure in Bad Weather?
Extreme weather is where a good coating job either proves itself or unravels fast. Wind driven rain, sudden temperature swings, and storm debris all put stress on a coating that a calm, sunny afternoon never would.
Before storm season, clear gutters and lower rails of leaves and debris so water has somewhere to go instead of pooling against the frame. Trim back any overhanging branches or dense shrubs near the enclosure. Trapped moisture from vegetation pressed against the screen is a slow, steady cause of mildew and coating adhesion failure that most homeowners never connect to their landscaping.
Cold snaps bring a different risk. Rapid temperature drops after a hot day can cause condensation to form on rails overnight, and that moisture sitting against a coating for hours adds up over a winter. Wipe down rails after hard freezes once temperatures rise, rather than letting standing moisture linger for days.
High wind events deserve a fastener check immediately after, not weeks later. Screens flex under gusts, and that flexing stresses the fastener points first. A five-minute walk around after any named storm or sustained high wind catches a loosened screw before it becomes a torn panel.
Above all, resist the urge to power wash away storm grime the moment weather clears. Wet, still-soft ground and a freshly stressed enclosure are a bad combination for high-pressure cleaning. Give it a day, use the hose, and save the deep clean for calmer conditions.
Afternoon thunderstorms can arrive quickly during Orlando summers, so watch the forecast closely in the first days after coating, especially in areas like Lake Nona and Hunter’s Creek.
What Homeowners Get Wrong About Post-coating Care
Most advice on this topic treats maintenance like a one-time event: coatit, maybe rinse it occasionally, forget about it. That’s backwards. The coating job is the easy part. What actually determines whether it lasts three years or eight is the boring, repeatable stuff nobody wants to do: the quarterly fastener check, the log entry, the resistance to grabbing a pressure washer because it feels faster.
The industry also oversells sealants as a fix for bad prep. A clear topcoat adds real UV and moisture resistance, but it can’t compensate for a rushed sanding job or coating applied above that 65% humidity threshold. Sequence matters more than product choice.
If you take one thing from all of this, make it the log. Homeowners who track dates and trouble spots catch the pattern in a corroding corner before it becomes a warranty argument or a full section replacement. Everything else, the hose, the soft brush, the touch-up kit, is just execution once you know where to look.
— Michel
Get Professional Help From Mr. Pool Screen
A DIY cleaning routine keeps a good coating job good. It can’t rebuild a finish that’s already failing across multiple panels, and it definitely can’t replace fasteners that have corroded past the point of a simple swap. That’s the gap Mr. Pool Screen fills, at a fraction of what a full enclosure rebuild costs.
Mr. Pool Screen’s Pool Screen Restoration service uses water-based acrylic coatings and stainless steel or Nylotech fasteners, applied with the same humidity and prep discipline covered above. If your deck is looking as tired as your screen enclosure, Pool Deck Staining refreshes concrete, wood, masonry, or stone surfaces in the same visit. Contact Mr. Pool Screen for an inspection and quote once you’re seeing recurring corrosion, widespread coating failure, or you simply want a result backed by a real warranty instead of another round of touch-ups. Browse the Project Gallery to see the kind of before-and-after results a proper restoration delivers.
Get a Free Estimate or call 407-250-1838
Sources
For deeper technical detail, see the Pool Screen Maintenance Checklist and this aluminum screen finish checklist covering coating standards.
- Coating Aluminum Pool Enclosures: Tips, Benefits, And Best Practices | ShunShelter
- How do I coat above pool enclosures? | a DIY coating guide
- How to maintain a pool enclosure and keep it clean year-round – Colonial Construction
- Caring for your artwork | Smithsonian Museum Conservation Institute
FAQ
How Long Should Coat Cure Before Getting Wet?
Wait at least 24 to 72 hours before exposing fresh coating to sprinklers, rain, or washing, longer in humid conditions. Exposing the coating too early is the leading cause of premature peeling at joints.
Can I Pressure Wash a Coated Pool Enclosure?
Routine pressure washing is not recommended because excessive pressure can tear screens and strip coating adhesion. A garden hose with a spray nozzle and soft-bristle brush handles nearly all regular cleaning safely.
How Often Should a Coated Enclosure Be Recoated?
Most coated enclosures need a full recoat every three to five years depending on sun, salt air, and cleaning habits. Coastal and high-UV properties often land on the shorter end of that range.
What Does Mr. Pool Screen Charge for Restoration?
Pricing for Pool Screen Restoration and Pool Deck Staining is available on request through Mr. Pool Screen’s website. Every job depends on enclosure size, corrosion extent, and coating choice.
Should I Clean a New Coating Job the Same as an Old One?
No. A newly coated enclosure needs its full curing window before any cleaning, and gentle cleaning only for the first several months while the coating fully hardens. After that, standard monthly rinses and quarterly inspections apply just as they would to an older finish.